12/05/2013

macarons for mothers


Happy Mother's Day !


Anneler Gününüz kutlu  olsun ! 


It's been almost two years since Ladurée has closed its doors in Turkey,
and beginning this year macarons are back again...
but , in the mean time,we've accomplished baking @ home ;)


2 egg whites (separated a day ahead,at room temperature)
3 spoonful of sugar...  beat them till white peaks form,glossy like a meringue mix...
add few drops of vanilla extract
grind 1/2 cup of almonds and mix with 3/4 cup of icing sugar and sieve together
add some grinded earlgray tea leaves for aroma...
add these dry ingredients into the meringue mix , in two stages...
gently fold it into the meringue mix using a flexible spatula
lift from the bottom,up around the sides, toward the middle,
being careful to not overagitate the meringue and lose too much air.
add the second half of the ingredients and repeat the folding motion
The batter should fall back in ribbons when you lift the spatula
spoon mixture into a large piping bag with a plain tip,
and pipe away on to a baking sheet lined with baking paper,
 leaving about 2 inches gap between the shells.
tap trays on bench to allow macarons to spread slightly,
to smooth out the tops and to help them form the "pied",frilly foot at the base
Leave aside to dry for 30-40 minutes.
bake them at 120 C (fan-forced) for 8 minutes... perfectly done!
let them cool aside and assemble with your favorite filling...
check here for various options...


Ladurée ülkeyi terk edeli iki sene geçmiş...
derken bu yılbaşı tekrar kavuştuk...
ammmma bu ayrılık süresince , biz öğrendik artık evde yapmayı ;)


2 yumurta akı (önceden ayırdım ,bi gün önce ve oda sıcaklığında)
3 kaşık toz şekerle .... parlak,bembeyaz olana dek,beze yapımı gibi çırptım...
içine az sıvı vanilya extract koydum
1/2 cup bademi un gibi çektim,3/4 cup pudra şekeri ile karıştırıp elekten geçirdim...
içine 1 ufak tea bag earl gray çayı ekledim..
meringue karışımına iki aşamada ekleyip
 spatül ile yandan içe doğru karıştırma usulü ile
macunumsu ama hafif akışkan kıvama gelene dek yedirdim...
 spatülü üstten kaldırınca krema aşağı akıcak ama parça parça.. devamlı diil...
sıkma torbasına alıp yağlı kağıda yuvarlaklar halinde sıktım..
 tepsiyi 3-4 kere tezgaha vurdum ve kurumaya bıraktım,30-40 dak gibi...
120 derece fanlı fırında 8 dakika piştiler ve muhteşem oldular!!!
soğumaya bıraktım ve her zaman buzdolabımda bulundurduğum lemon curd ile birleştirdim...
farklı aromalar için burayı tıklayın... 


10/05/2013

DIY yogurt


tastes better and no preservatives added!
you just need
 
 
 1 lt dairy full fat pasteurized milk
1 tablespoon of plain/unflavored yogurt (at room temperature)


Heat the milk to the boiling point...
 and keep simmering on low heat for 20 minutes...
(tip 1= rinse your pan with cold water ahead!
that way, the bottom of the pan will be cleaned easily)
pour the milk into your earthenware pots...
and let cool to lukewarm (45 C),
the temperature at which the yogurt cultures
 will consume the lactose in the milk, and reproduce themselves.
(tip 2= you can easily determine this temperature:
insert your finger into the milk and while counting to 7,
your finger should not burn from the heat!)
my milk reaches to this ideal temperature exactly in 35 minutes...
if the temperature is below than this desired level, fermentation will not occur!
if the temperature is too high,
fermentation will occur too soon and will cause a sour taste!
at this moment,you may add 1 tablespoon of yogurt-diluted with
 2-3 tablespoons of lukewarm milk,
into our pots very gently,pouring down the side,
so that any skin that may have formed on top is not disturbed...
the reason we dilute the yogurt before mixing in,
is that the yogurt and milk will be at same temperatures,
before fermentation starts,which will avoid the “sour” taste...
(tip 3= cover the pots with colanders instead of lids,
which facilitates evaporation/ventilation!)
Cover with a clean dishtowel,then wrap with a thicker cloth...
and leave to rest for 5 hours
put in the fridge without the lids,and leave it for a day!
 
 
Then the rest is up to your imagination! 
(Don't forget to save a small amount to make the next batch!)


Ev yapımı 
hem tadı güzel,hem katkısız...
 
 
1 lt günlük süt (çiftlik sütü bulursanız şahane!)
 1 yemek kaşığı yoğurt (oda sıcaklığında)
 
sütü çelik tencerede kaynatın,
altı kısık yaklaşık 20-25 dakika kaynama noktasında
 sıcaklığını koruyarak pişirmeye devam...
(püf 1= tencereyi öncesinde,soğuk su ile çalkalarsanız,
dibi tutmuyor ve kolay temizleniyor)
 sonrasında sütü mayalayacağımız çömlek kaplara aktarın...
doğru mayalama ısısına gelene dek (45 C) ılımaya bırakın!
(püf 2= bu ısı parmağınızı süte batırdığınızda
 ve 7 ye kadar saydığınızda,
yanmayacağı sıcaklıktaki ısıdır!)
benim kaplarımda bu ısıya yaklaşık 35 dakika sonra ulaşılıyor...
eğer bu ısının altındaysa,mayalanma olmaz...
üstündeyse mayalanma hızlı olup yoğurtun tadında ekşilik oluşur
bu aşamada,bir kasede ılık süt ile incelttiğimiz oda ısısındaki yoğurdu,
çömleklerin kenarından,sütün tutan kaymağını bozmaksızın katın ve karıştırın...
burada,yoğurtu ılık süt ile inceltmedeki amaç,
hem mayanın sütün sıcaklığına erişmesini sağlamak
ve hem de sıcaklık farkından dolayı ekşimeyi önlemektir...
(püf 3= kapların üstünü kapak yerine süzgeç
ya da ızgara nehalelerle kapatın,
böylelikle buharlaşma-havalanma daha kolay sağlanıyor...)
önce mutfak bezi ile,sonra da daha kalın bir örtü ile sarıp sarmalayıp
 5 saat bekletin...
buzdolabına ağzı açık olarak kaldırın
ve 1 gün yoğurdunuza dokunmayın...
 
 
sonrası size kalmış artık... 
(amannn , bi daha ki sefer için ayırmayı unutMA!)


07/05/2013

again...


Recipe here,this post is only intended to make you lick your lips :)))


Tarif burada,bugünkü sayfam, sadece iştah kabartmak için :)))


05/05/2013

yemeği beklerken...


definitely must be placed on your table for your hungryguests,
waiting anxiously for dinner to be served…
 
 
bunlar ,
yemeği sabırsızlıkla bekleyen,karınları guruldayanmisafirlerimiz için
şarap,zeytin üçlemesini tamamlamak üzere
 kesinlikle soframızdayer almalı
 
 
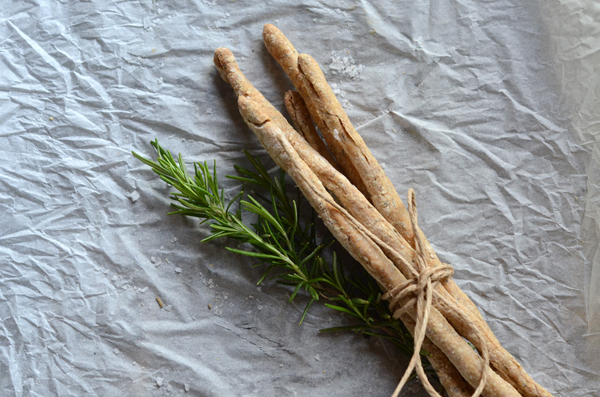
Rosemary Grissini
 
1.5 tablespoon finely cut,fresh rosemary leaves
 63 gms semolina flour
 150 gms wholewheatflour + 100 gms flour
 4.5 gms salt
 3.2 gms instant yeast(1 teaspoon)
 195 gms cold water
 14 gms olive oil


combine the rosemary, semolina flour, flour, salt, and yeast
 combine the liquids,waterand the olive oil
while working with your hands,add the liquids to the dryingredients in a thin stream
continue processing until the dough holds together
transfer the dough to a lightly oiled, covered container
and leave to double in size,for about 1.5-2 hours 

 preheat the oven to175 C
and line two baking sheets with parchment paper
 divide the dough intotwo pieces
while working with the first piece, cover and refrigeratethe other
on a floured counter,stretch and roll the dough into arectangle (20X10 cm)
cut the dough into 13-15 strips and stretch or roll eachstrip
 to the length of your baking sheets
brush with olive oil and sprinkle with coarse salt
 bake for about 30minutes, until lightly browned.
 
 
biberiyeli grissini
 
1.5 kaşık doğranmış taze biberiye yaprakları
 63 gm irmik unu
 150 gm tam buğday unu+ 100 gm un
 4.5 gm tuz
 3.2 gm kuru maya (1çay kaşığı)
 195 gm soğuk su
 14 gm zeytinyağı
 

biberiye,unlar,tuz ve mayayı karıştırın
sıvı malzemeleri (su ve zeytinyağ) karıştırın
sıvı malzemeyi,kuru malzemelere azar azar eklerken,
elle karıştırarak yapışkan bir hamur elde edeceksiniz…
hafif yağlanmış bir kap içine alıp,üstünü örterek,
1.5-2 saat , iki katı kabarana dek dinlenmeye bırakın

fırını 175 C  ısıtın
ve iki fırın tepsisini yağlı kağıt ile döşeyin
hamuru ikiye bölüp,ilki ile çalışırken diğerini örterekbuzdolabında bekletin
unlanmış tezgahda hamuru dikdörtgen şekilde açın (yaklaşık20X10 cm gibi)
uzunlamasına 13-15 çubuk kesip, elinizle hafif yuvarlatarak,
 tepsinizin boyutunagöre inceltip ayarlayabilirsiniz…
fırına vermeden evvel hafif zeytinyağı ile fırçalayıp,irituz serpebilirsiniz
fırında 30 dakikada piştiler…


04/05/2013

metamorphosis...


now and then...


dün - bugün 

02/05/2013

party food...


guaranteed to please the entire family
perfect for a picnic or a party night
fun and quick to make
a truly finger-licking food
with a flavorful,crunchy crust
and amazingly tender and juicy inside…
(recipe from Arda !)
Add this recipe to your “must-try” list!
 
 
tüm aile fertlerini mutlu edecek,
parti akşamlarınızı ya da piknik buluşmalarınızı süsleyecek,
yapması basit,hızlı,ve hatta eğlenceli,
parmakları da yanlışlıkla yedirten,
ısırırken çıtır çıtır gevrek ve bir o kadar da
yumuşak,sulu sulu lezzette bir tarif…
(Arda'dan ! )
hemen “yapılacaklar”ınıza eklenmeli!
 
 
 crispy oven-baked drumsticks
 
10 chicken drumsticks
(marinated in soda water for 1-2 hours before baking)
4 eggs (beaten)
1,5 cup flour
and  crunchy coating
  (1,5 cup corn flakes and
12 grissini crushed in blender
and flavoured with
1 coffeespoonful each of
your favorite dried herbs and seeds,
-I used thyme,mint,ground coriander,ground mustard seeds-
and 1 teaspoonful each of
your favorite spices,
-I used cumin,ginger,cinnamon,chili pepper,
ground black pepper-
and salt)
you may switch cheese crackers with grissini or
add finely grated parmesan and reduce salt…
 
 
Preheat oven to 180°C.
dry your drumsticks grasping with paper towels,season with salt
have your three mixes ready:
one shallow bowl full of flour
one bowl with your beaten eggs
one shallow bowl full of coating mix
coat your drumsticks one at a time,
first with flour,then with egg mix,and lastly with the coating mix
place them on a grill tray and then into the oven…
make sure to place another oven tray, full of water in the base level of  your oven
bake for 45 minutes until crisp and golden 


çıtır çıtır butlar 
 
10 tavuk baget
(öncesinde 1-2 saat madensuyuna yatırdım)
4 yumurta (çırpılmış)
1,5 cup un
veee çıtır üst kaplama için
(1,5 cup corn flakes ile
12 adet grissini beraber blender’da kırılıp,
1 dolu kahve kaşığı arzu ettiğiniz kuru ot ve tohumlarla,
-ben kekik,nane,kişniş ve hardal tohumu toz halde koydum-
Ve 1 dolu çay kaşığı arzu ettiğiniz baharatlarla,
-ben kimyon,zencefil,tarçın,kırmızı tatlı toz biber,
acı pul biber,karabiber koydum-
ve tuz ile tatlandırın)
grissini yerine peynir aromalı krakerler kullanılabilir,
ya da ince rende parmesan peyniri eklenebilir,tuz miktarı azaltılabilir…


  fırını 180 C ısıtın
bagetleri havlu kağıt ile kurulayın,hafif tuzlayın
üç harcınızı hazırlayın
bir sığ kapta un
bir kapta çırpılmış yumurtalarınız
bir sığ kapta kaplama karışımı
bagetleri tek tek önce una, sonra yumurtaya
 ve en sonda baharatlı karışıma bulayın
fırın telinizin üzerine dizin ve doğru fırına…
bu esnada fırının en alt rafında su ile doldurulmuş fırın tepsinizi koyun
45 dakikada çıtır çıtır kızaracaklar…
 
 
ve sona yaklaşılıyorrrrr


Related Posts Plugin for WordPress, Blogger...